My sincerest apologies for being... absent... I have been busy with school and attempting to find a job.
I have recently come across something that has brought my fantasies to life... the Epic games has released their unreal 3 engine free for non commercial use... and their licenses for anyone using it for commercial use is beyond acceptable... $99 to set up the contract at time of retail and 25% revenue after you make your first $5000. It has.... opened up the tool set for anyone to create a good game... I will most likely continue working with OGRE... but for now Death Bringer has been switched to the UNREAL engine.
Friday, January 22, 2010
Saturday, August 29, 2009
Another Anti-distortion technique
Thanks to shadowfeign on the OGRE3D Forums, another technique to limit animation distortion has come to my attention. Via modeling the joint at a 45 degree angle. However, for joints such as elbows, where the final angle is more than 90 degrees, deformation will be visible once again, but by applying it to joints such as the fingers, you will have much less work to do on the final tweaks. (Removing the bones that follow the real skeleton that have no vertexes attached to them that are there only to create the final bone layout)
View his video:
View his video:
Monday, August 24, 2009
Case Study: Limiting animation distortion
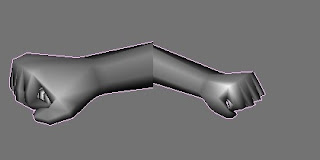
With any 3d model, if you are using a bone only animation, there will be a certain amount of distortion at the joints. This is quite apparent with low poly models. Although there is an acceptable limit, based on how small the part will be on the screen and how much the bone bends, it is good to know how to set up things to limit said distortion. In this example we will look at the fingers on Ethan's hands. In the left example, you can see that when the fingers bend, they begin to thin, while on the right, a technique was used to make the fingers stay close to their original thickness. Lets look at that now.
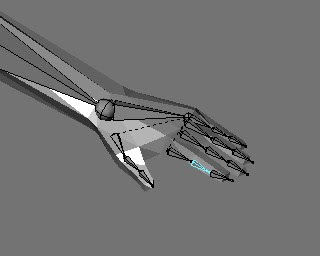
Here we have the original bone setup: bone joints in the center of the vertexes that bend.
As you can see below, one method of removing part of the distortion was to add another layer of vertexes, and make sure the part of the finger stays the same size. This works to an extent, but with a way that I found, I create a better look with less vertexes.
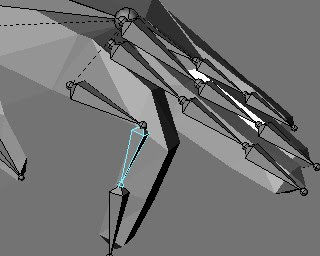
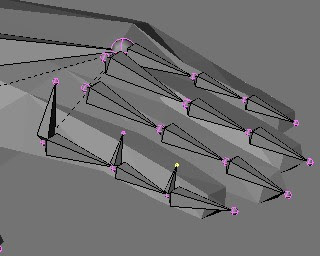
Below, you can see the new bone set up, and the vertexes are assigned to the new bones. The bones originate from the center of the joint, and extend to the top of the joint. A constraint is added to make the bones rotate 50% of the old bones, and then the length of the bone (local-y) is scaled as the bone rotates to compensate for the distortion caused by the rotated vertexes. At this point, I am not sure of the ability to export local bone scaling, however if the current format doesn't allow it, I can always create my own. Right before export, the bones that don't have any vertexes assigned to them are removed, to make sure they do not affect the speed of the model.
Saturday, August 22, 2009
3D modeling tips: Everything else
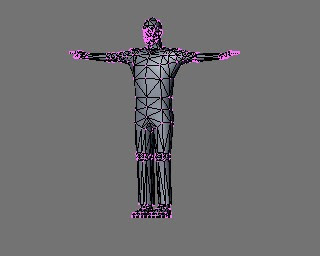 Let me just say this now: I am not an expert. However, I have made some decent models in the past, and I will not give up until things reach perfection... or at least close enough. I am merely stating what I learn along the way. If you want a full modeling tutorial, might I suggest the 3dtotal tutorials. There is one on there especially for low poly characters for games, which I brought some of the information with me to use with using the makehuman models as a 3d reference. This is also important to learn: MakeHuman does not make characters that do not follow a human guideline. (The Hulk, demons, werewolfs, ect.) However, a good technique is to use blender's sculpting tools to turn the makehuman model into the rough shape of the character your trying to make.
If you are like me, you will cringe at the look of an untextured low poly model. But remember, ultimately, you will copy this model, and use it to sculpt a very high detail model for blender to reference to create tangent space normal maps, thus making the model, except for the outline, look almost exactly like an extreme high poly model that would kill a tesla gpu.
Back to the main topic: Modeling the rest of it. Basically, hug the make human model and make a low poly cage. For areas of clothing, make the cage slightly bigger at that point. What closely what that type of clothing would do, as I said in an earlier post, some shirts would pull tight as the arm would go up, so model for that type of animation. Make sure to have vertexes at any joints. I am experimenting with a different way to set up the bones to eliminate distortion, more on this later. To create skirts, jacket tails, hair, ect, extrude from the model where it s to be attached, and then delete any unnecessary vertexes. When creating any collision meshes, make independent boxes, not one low poly cage. This is because the physics engine can do collision tests faster on a group of boxes than a mesh that a ray can intersect more than once. (concave vrs. convex) For the skirt example, if you plan on simulating cloth with it, delete the portion of the legs that you can't see and create the collision boxes for the legs to create close to real fast simulation.
Thursday, August 20, 2009
Low Poly Facial modeling for advanced animation
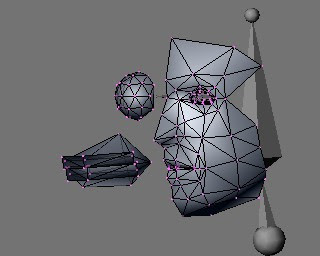
The face is the most important aspect of a character. People look at faces all the time, if something is off, you can just tell. Out of the almost 2k polygon Ethan Bridger character, with independent fingers, almost 600 polygons belong to the head alone. What you see in the picture above is half of Ethan's face, half of his teeth and mouth chamber, and his eye.
The Lips:
Pay attention if you will, to the corner of his lips. There are a few extra polygons that need to be discussed. They are there for animation purposes that seems to have been widely overlooked. When you smile, a crease forms between the lips and the cheek area, and you have to have enough polygons to define that crease for the smile. Without the crease, the smile looks smaller than it is. If your character isn't ever to smile in the game, then remove these extra polygons.
The Mouth:
The mouth has no tongue, to save polygons and isn't exactly attached to the lips. The attachment isn't necessary as the lips never go below the teeth on Ethan when he talks. The teeth are just one curved block that will have a displacement map attached to it to give it extra detail, and the mouth's chamber is only there to make sure that you will never see the back of the neck through the inside of the mouth.
The Nose:
Not much to tell here. All you need is the basic shape of the nose, not too high def. extra detail will be added later with the distortion maps.
The Eyes:
The eye is just a sphere with the back end cut off. For animation, the bone would start where the center of that sphere would be, and end at the eyes tip. Further on the eyes, never let the eyes stand still, use a combination of constant head movement and slight eye movement to give your character more life. Otherwise, you will just get a cold stare. Also, an empty object is a great way of making sure that the eyes are aligned with each other when creating your animations by adding a track to constraint on the eye's bones.
Using 3d references to ensure porportions for human characters
If you could, you would most likely stuff an entire person in your virtual 3d space and model around them. Doing so would make the entire model proportionate exactly. This technique has been used similarly with modifying whats known as the unimesh, a very low detail man that can quickly be modified into almost any character. However, if you are new to 3d modeling, you most likely don't have a good unimesh, but not to despair! A very useful program called MakeHuman can be used to create a 3d reference model quickly. Just tweak the model to your liking, export to collada, and import via blenders collada 1.4 importer.
The makehuman model is too high poly for typical video game usage, and since the newer games are able to use tangent space distortion maps (uv mapped images that tell the graphics engine to distort light as if the model was shaped with much more detail) you really want to make as low poly model as possible, while keeping enough verticies for animation.
Also, in the body area you want to remember to make the model a bit bigger for clothing, and reference your design images. Such as Ethan, back when he is alive or hasn't yet aborbed the leftover essence of the grim reaper, he wears a button down shirt that when he extends his arms out, the shirt would strech between where his belt is and the sleeve, so I would model the shirt streching like that, and when he puts his arms down vertex weight mapping would be modified so the strech line would fall against his body.
Upcomming: modeling low poly characters for detailed animation: The Face
Wednesday, August 19, 2009
Voice modification with Audacity
If you have a low budget, then you most likely cant afford many voice actors. One way of going by this is by modifying your own voice in a free open source program called Audacity. With just a few modifications of pitch and speed, and changing the way you speak, you can get a wide variety of voices for your games. Although, while you can get a good recording (after a clean-up) with a built in mic to a computer that was murdered by a stray bowl of milk, and then resurrected by ancient voodoo magick, (yes, my laptop is a zombie laptop), you will get a much better recording with a proper mic. Audacity is a good program to use for the clean-up, as all I do right now to get a good voice recording is just use its remove noise filter. After that, I just deepen the voice (speed -10, pitch -6, my voice sounds a bit young to me.) to get Ethan's voice.
If your a guy, then just raising the pitch to get the female voice will not do. There is more of a difference than pitch in that. While this wouldn't work for a high quality female character voice, you can get a female sounding voice with a program called MorphVOX, passed through a few filters to make it sound like a phone call and amplified down was... acceptable to my OCD ears. For best results, get a girl that can act.
Audacity can also be used to modify any sounds that you want. If you have a gunshot and need an explosion, use the tempo filter to make it longer, and possibly use bass boost and high pass filters to get that rumble. Speaking of explosion, a tutorial on using the white noise generator to make an explosion sound can be found here.
Subscribe to:
Comments (Atom)